| Upon booting SVi you will see the main SVi UI which consists of the SVi (version) window, the Vision control window, the keyboard control window, the MIDI window and the Output window. We will now go through each window explaining the functions and how to use them. | |
SVi window
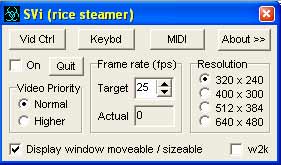 Here
you have buttons for bringing each window to the front and an about
button that will reveal info about your version of SVi, etc. Also
in this panel you have a tickbox for turning the SVi output on and
off and the quit button for closing SVi. Below that you have a radio
button for setting the priority for SVi on your system in most cases
you can just leave it as normal as your system will not often be
running other stuff @ the same time as you are using SVi live (presumedly).
Beside that you have a FPS target setter and counter, if you wish
you can reduce (or increase) the taget framerate for SVi depending
on your systems abilities.
Here
you have buttons for bringing each window to the front and an about
button that will reveal info about your version of SVi, etc. Also
in this panel you have a tickbox for turning the SVi output on and
off and the quit button for closing SVi. Below that you have a radio
button for setting the priority for SVi on your system in most cases
you can just leave it as normal as your system will not often be
running other stuff @ the same time as you are using SVi live (presumedly).
Beside that you have a FPS target setter and counter, if you wish
you can reduce (or increase) the taget framerate for SVi depending
on your systems abilities.
Next to that you have some resolution radio boxes, these are to jump the output window to standard quaterscreen sizes as SVi is designed to be used with 2x zooming scan convertors. Also there is a radio box to allow movement and resizing of the SVi output window incase you want it on a different desktop or you need to tweek the dimensions of the oputput window to work with your scanny. And finally there is a W2K tickbox to force SVi to W2K complience.
Vision control
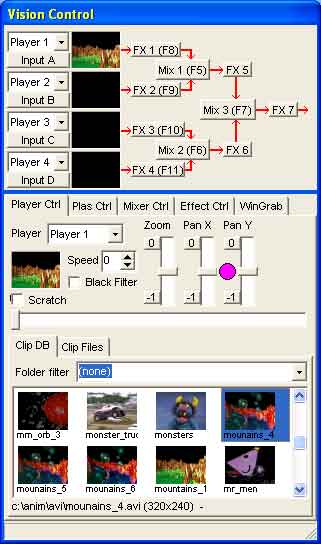 This
is were most of the mixing action takes place. Firt you need to
get some clips into your clip database, do this by opening a windows
explorer window, highlighting the clips you want and then drag them
into the Clip DB panel, they will import and you will get an thumbnail
in your DB representing the clip, you can drag as many clips as
you like into the clip DB as it is unlimited :) or you can browse
your computer for clips using the clip files tab. You can delete
clips from you clip DB window by right clicking and selecting Delete
from DB or highlighting the clip and pressing CTRL+DEL
This
is were most of the mixing action takes place. Firt you need to
get some clips into your clip database, do this by opening a windows
explorer window, highlighting the clips you want and then drag them
into the Clip DB panel, they will import and you will get an thumbnail
in your DB representing the clip, you can drag as many clips as
you like into the clip DB as it is unlimited :) or you can browse
your computer for clips using the clip files tab. You can delete
clips from you clip DB window by right clicking and selecting Delete
from DB or highlighting the clip and pressing CTRL+DEL
The top section of the vision control panel is your virtual kit, with 4 inputs, 3 mixers and 7 FX units, combined in the layout of the tree (red arrows). Each input can be assigned one of the 4 players, 4 plasmas or the WinGrab from the drop downmenu, to put a clip into a player just use the mouse to select the player/input window/button (or use F1/2/3/4) and then double click a clip in the clip DB below (or use the keyboard mapped clips). Each input then goes into an FX unit which can be set to do nothing or apply one of the FX covered below in the Effect control tab to the video source and can be selected with the mouse or the label keyboard short cut. These then continue into the Mix units that can be selected in the same way, they combine 2 sources into one by either switching, overlaying or crossfading the inputs (covered further in the Mixer control tab). Using these units together in the flowtree shown you create, mix and effect the video.
Continuing down the first tab is the Player Control tab, on this tab you can set which player your working on with the Player drop down, control the speed of the player, add a black filter (SVi will key on pure black, explained below, but with this you can increase the tolerance of the overlay). Next to that are the zoom and pan X/Y sliders for each player, all controls are independent for each of the four players, with the buttons providing 0 (for resetting) and a -1 to set the slider to the negative of what evr it is set at. You can use the pink dot by clicking and holding the mouse button to pan a clip with the mouse rather than using the individual sliders. Below all that is the clip scratch tick box (to turn on and off) and the slider to control the scratching of your clip (click, hold and drag). As it is for the players it contains the Clip DB window aswell.
The next tab over is the Plas(ma) control, which also includes the drop down to select which of the 4 plasmas you are working on. Below that is the # Pals counter box that allows you to change the number of (key)colours in the plasma @ any one time. Next to that are sliders to control the speed at which the plasma cycles and the size of the bands/areas of the plasma. Below are the actual plasma patterns which are select with a double click (just like a regular clip).
The Mixer Control tab can be selected with the mouse or relevant labeled keyboard shortcut, it has a drop down to select which mixer your working on (if you haven't already done so with keyboard or mouse selection) like the other unit controllers. Next to that is the mixer mode, this sets what way you are combining the 2 video streams that are going into the mixer unit. Overlay layers the 2 incoming video streams keying out pure black from the top clip to reveal the layer below (you can increase the removed area by using the black filter on the player tab). You can change which layer is on top with the A/B switch slider next to the mixer modes. Xfade allows you to crossfade between the 2 video streams (gradually seeing more of one video and less of the other). You can change how much of earch stream is visible by moving the A/B slider from one end to the other. Switch allows you to swtich between the 2 video streams with the A/B slider (no incrememnts like the Xfade, just a straight switch from end to end) when the A/B slider is selected (dotted outline) you can use the left and right or up and down arrow keys on the keyboard to switch between A and B positions.
The Effect Control tab is the next over and contails all the controls and settings for your FX modules. On the left is the drop down menu for selecting which FX unit you are working on (if you haven't already done it by clicking on it in the layout above or using the labeled keyboard shortcut) Below that is the FX selector, select an effect by clicking the name, it will then start to effect any video stream that is running into the FX unit as shown on the layout.
The controls for the feedback in the box on the top right include Zoom which sets the direction and amount of depth of the feedback trail with up from centre being away from the screen (shinking feedback) and down from centre being towards the screen (zooming feedback). The 0 button resets the slider to the centre (no zooming) and the -1 button wil reverse the current value of the slider, eg if you have a zooming feedback it will switch to a shrinking feedback of the opposite value. The pan X and pan Y sliders have a similar effect panning the feeback trail in the direction specified by the sliders (with the 0 and -1 buttons having the same effect). To control both X and Y pan @ the same time click with the mouse on the pink dot and drag in the direction you want the feedback to go in.
The wave FX parameters are in the next box down with 3 sliders for Phase, frequency and amplitude. ASCII action is the last with an invert button if your video is too bright to get better clarify out of the ascii and 3 full Red, Green and Blue values for full customization of the colour of your ascii text.
The last tab is for Wingrab, this function is highly unique to SVi, the concept is that it gives you a window that will sample any area of your desktop and input it into one of the player inputs allowing you to use the output windows of other applications as inputs into SVi. First tick the Show Wingrab region box, now you will see a movable, resizable window. Move the window and resize it till it covers the area of the desktop or application you wish to stream into SVi, then the hide button. Below is a tick box for black filtering that has the same effect as it does on the player controls.
For live triggering the Keyboard Cntrol window is where its at. The keyboard control window is where you setup your keyboard clip layouts for triggering during an performance. You can configure up to 35 different keyboard layouts full of clips (with the first 12 accessable with CRTL+F-key shortcuts) and change them with the Patch drop box. Next to that is the Player drop box, this specifies which player the clip you triger from the keyboard will go into and is most easily changed useing the the F-1,2,3 or 4 keys. Beside this are tick boxes for keyboard control from all windows which allows you to trigger clips form the keyboard when you have the vision control panel selected/active/lit (otherwise you need to have the keyboard control panel selected), and for stay on top which allows the keyboard control panel to stay on top of all the other SVi panels even when one of the others is selected and would normally cover it.
On the keyboard view tab you can see the layout of the keyboard with you clip thumbnails above each of the keys, unprogrammed thumbnail keys appear black, to program (or RE-program) a key in the layout simply drag the thumbnail across from the clip DB panel onto the key thumbnail (or alternatively you can right click on the thumbnail in the Clip DB panel and select Add to keyboard and then press the key you want to assign it too), using this method you can fill you many layouts. You can also edit your clip assignments with the list view tab, clicking the edit tick box and altering the clip names, locations, patches, keys, etc.
On the bottom right of the keyboard control panel is a button to update your view of the clips in shown on the layout if you have changed patches or you can set it to update them automatically when changing patches by ticking the Autoview option.
The last window in SVi is the MIDI window. In SVi (currently) you can only TRIGGER CLIPS via midi. I will gloss over the midi aspect of SVi a little as it is currently a little underdeveloped and I don't have a midi device myself to test all the functions with.
The first tab includes a drop down box of available midi data streams for you to select one of to control SVi (you can control it with midi capable software with software connectors like Hubi's loopback). Below are buttons to connect and disconnect the MIDI stream and a tick box to trace (view, display) the input into the window below. To assign clips to midi notes, you right click the thumbnail of the clip you wish to assign in the Clip DB window and select Add to MIDI from the drop down menu, you will then get a box asking you to specify the Patch, Channel and Note that you would like to assign the clip too. As with the keyboard the patch can be changed with keyboard (PC not midi) shortcuts, you can also have unlimited midi patches (numerically) that can be chaged from the MIDI window in list view tab which is the next tab. The list view which is VERY similar to the List view tab on the keyboard control window showing you the clips you have assigned to what MIDI notes and channels and allowing you to edit them.
Please email any corrections or suggestions to morph@vjcentral.com
(c) MoRpH, 2003
[many thanks to morph... - chris]